Help & advice
A guide to loft extensions
Last updated: August 25, 2026

“Before you speak to a builder or architect, here's how to explore whether your loft could become useful living space - and what you need to think about.“
A loft conversion can be a great way of creating more useful space in your home, but before you start talking to builders, it is worth understanding what you actually have to work with. The shape of your roof, the available headroom, the position of the stairs and the amount of space you will lose to the new construction will all affect what is possible.
In this guide, I'll take you through some of the main things to consider and how you can start exploring the options yourself.
First things first - what is a loft?
This is the triangular space above your top floor living space ceiling, created by the roof joists (triangular shaped frames) or rafters (timbers that slope from the ridge downwards towards the outer walls).
A benefit of a loft space is, of course, that it can be used for storage - your possessions and also possibly for plumbing and water tanks.
Most likely, when this space was built, it was not planned for it to be converted into living space.
The roof joists or rafters were sized to perform their structural job only - to hold the roof in a triangular shape, and nothing else.
Therefore it is almost certain that structurally the existing top floor ceiling joists or the bottom chord of the trusses are not strong enough to be used as another floor.
Types of loft conversion / extension
A loft conversion converts the existing triangular space into extra living space.
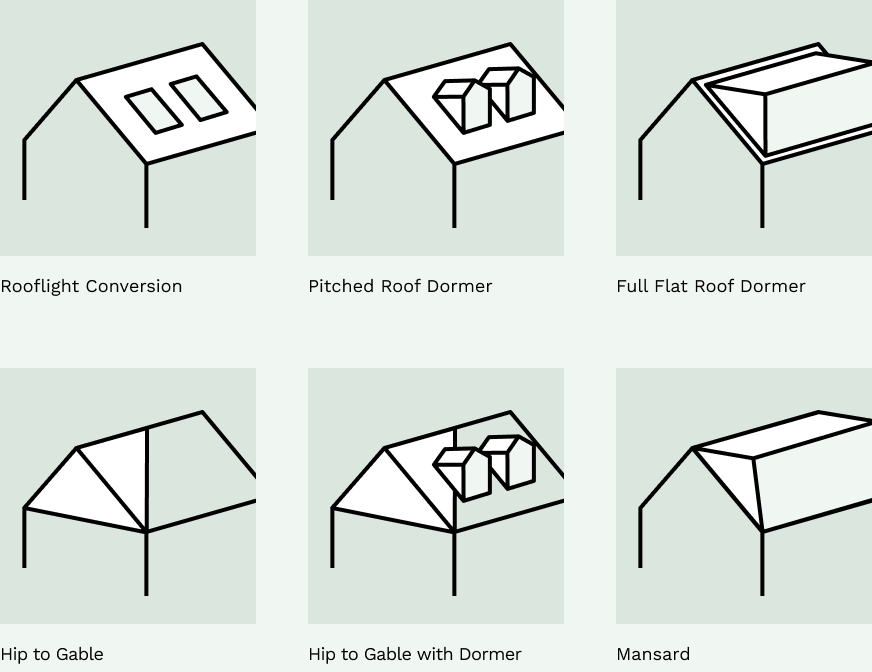
There are several variations in how to convert and extend:
- Rooflight conversion: The simplest loft conversion, using Velux type rooflights on the existing roof pitch. No extensions
- Pitched roof dormer: A favourite of planning departments. Creates pitched additional volumes with a window in each
- Full flat roof dormer: The big, modern one. Usually at the rear. Creates the most space
- Hip to gable: Converts a hipped roof to a gable roof to provide more internal space
- Hip to gable with dormer: Converts a hipped roof to a gable roof with dormers on top
- Mansard: Again, liked by planning departments. The original theory being that a Mansard extension cannot be seen from street level due to its sloped and receding face
A common reason to convert or extend your loft is to create an additional bedroom - possibly a master suite that has its own shower or bath room.

Measuring your loft
You will probably be considering a loft conversion or extension and wanting to explore the options by drawing with Reno's floorplanner tool, probably before involving anybody else (like a builder or architect). This is called carrying out your own 'feasibility study'. Get used to drawing things just to test them - you have to draw things before rejecting them, but you have to draw them with meaning and intent just to 'reject' them - kind of exhausting but worth it to know you have explored all the options.
“In my first job as an architect, the mantra for the whole office was ‘if it's not drawn (properly) it can't be discussed!’”
You'll need to start your loft conversion / extension feasibility by taking some measurements in the loft.
So open the hatch, lower the ladder, get a torch and up you go…
It's worth spending a bit of time on this to try and get it right, as much of your decision making could be based on this.
Be careful, especially if the loft is not fully boarded - do not stand between floor joists / ceiling joists, your foot will go straight through! If you are not confident, don't do it.
You need to measure the headroom in the loft as it is.
This may involve clearing some of your stored stuff, pushing some insulation to the side and disturbing a few cobwebs. Make sure to replace any insulation when you have done. Wearing gloves, a dust mask, long sleeves, and even goggles may help with the dust and fibres from the insulation.
You are trying to measure the triangle of space that sits inside your roof truss, or inside your rafters and joists.
Firstly, measure to the highest point, normally the centre, of the triangular space.
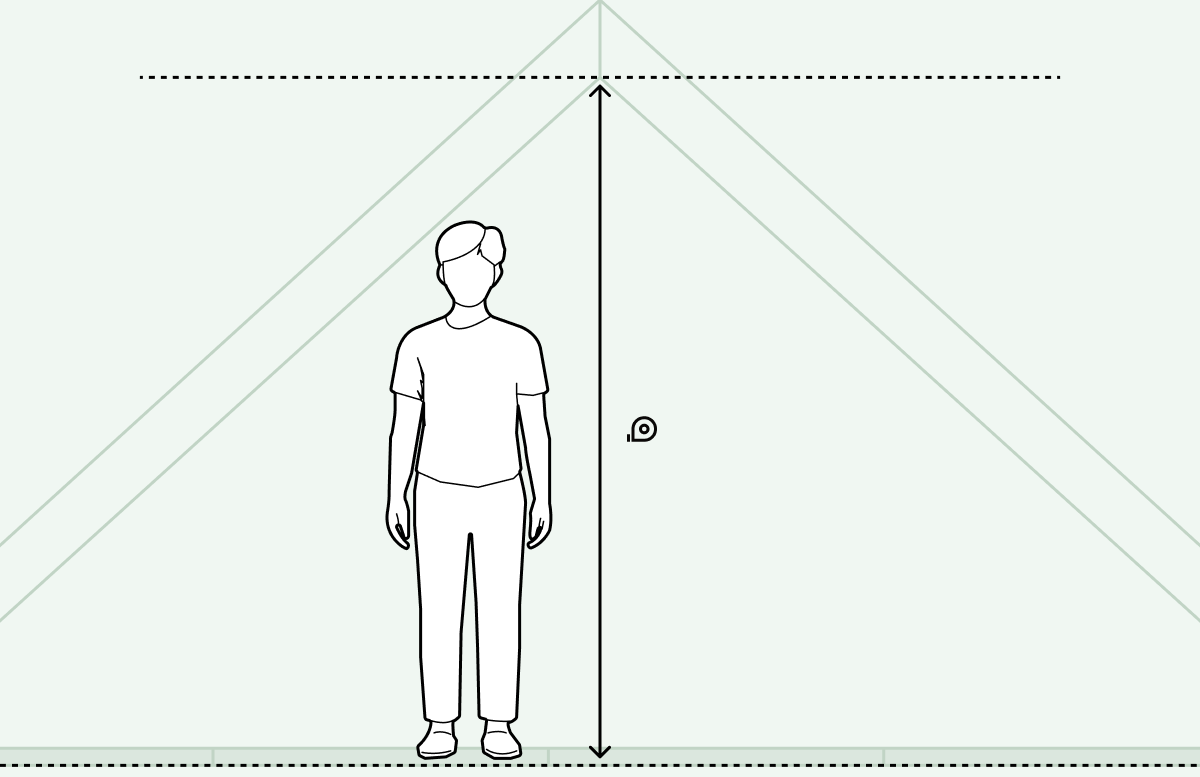
- Measure from the inside of the junction where the top chords of the roof trusses meet, at the apex (or where the rafters meet and the underside of the ridge beam)
- Measure straight down - this has to be vertical - to the top side of the bottom chord of the truss, or to the top side of the ceiling joist if you don't have trusses
- Check your measuring tape is vertical! If in doubt use a string with a weight at one end (which will always hang vertically) then measure the string with your tape on a horizontal surface
- You need the measurement without any boarding or stilts. This is the maximum existing headroom
- For reference, mark the lower measuring position you use , vertically below the centre line of the ridge, on the loft boards or on the top side of the bottom chord of the truss (or the top side of the ceiling joist if you don't have trusses) - masking tape is useful for this
Then, from the centre line position you have just marked, measure horizontally, tight into the lower inside corner where the sloping top chord of the joists meets the bottom chord. If you double this measurement, this will give you an approximate width of your existing loft space.
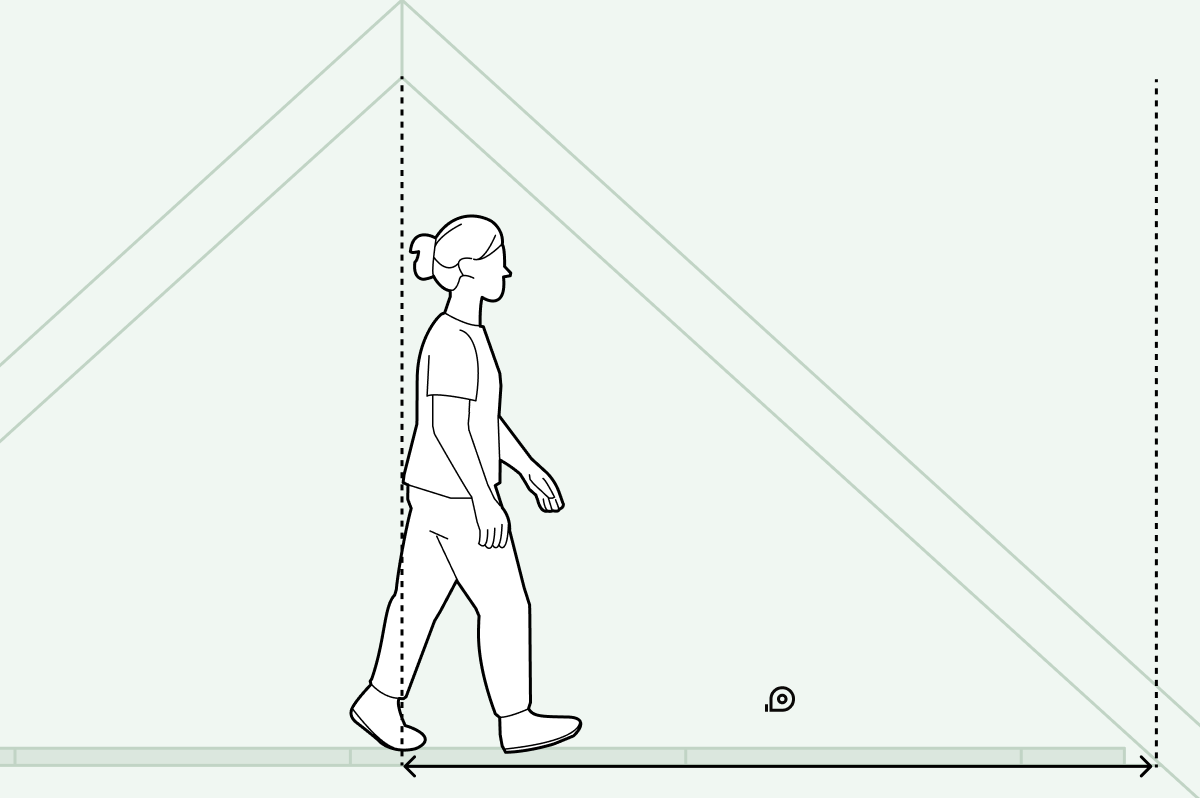
This second measurement can be cross checked by measuring the distance between your external walls at first floor level. The roof trusses or rafters will sit on these external walls, although the exact detail will vary - approximately, the corners of the triangle of space you are trying to measure will sit above the inside face of your cavity wall.
As a rule of thumb for UK houses, you will lose approximately 150mm right round from the triangle of space inside your existing roof truss. This means a loss of approximately 300mm headroom. This allows for new floor structure, floor finishes, insulation and ventilation on the inside of the sloping sides, and finishes on the inside of the sloping sides.
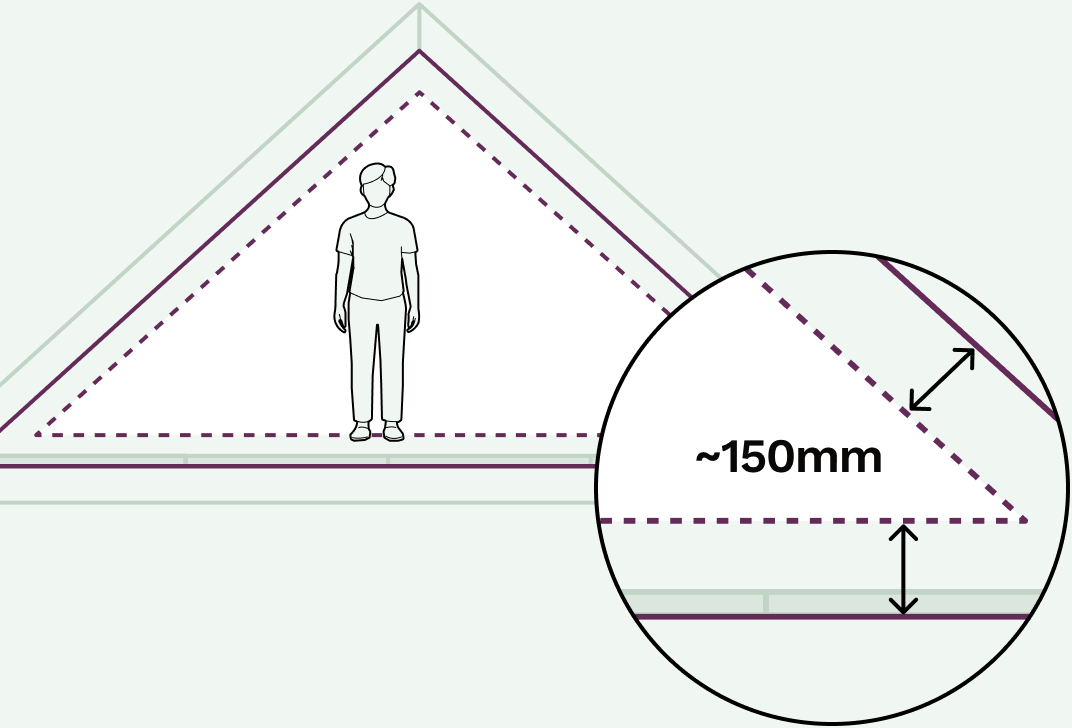
So your triangle of usable space gets smaller.
When you stand in your loft, imagine you are a foot taller (that's the 300mm you will lose!) and you will quickly get the sense of whether a loft conversion is possible, and also whether a roof dormer is needed.
When drawing in Reno, you need to draw the space that is left after you have reduced the triangular space by 150mm round all three sides.
Please note:
- Existing roof trusses, rafters and ceiling joists all vary in size. New structural floor joists for your loft will vary in depth according to the span and the layout of walls propping them up at first floor level
- Different insulation products have different thicknesses for insulating the sloped sides
- Different floor finishes have different thicknesses and build ups (layers) underneath
Headroom
UK building regulations do not enforce a specific minimum height for ceilings in rooms!
But they do over staircases (and escape routes) - which is 2.0m over the pitch line of the staircase (under a sloping ceiling this can drop to 1.8m at the lowest point).
But beware! Low ceiling heights can have a massive effect on the quality of the space - how cramped it feels. Also, lower ceilings trap heat.
2.0m headroom is extremely tight. How tall are the people using the room? Will they get taller (teenagers!)? Even flush light fittings and smoke alarms protrude from the ceiling.
As an architect in practice, I designed to an absolute minimum of 2.1m headroom, and this would only be at pinch points, not for whole, flat ceilings.
Rooflights, positioned in key areas, can provide extra height, as can exposed rafters, with pockets of extra height between them.
Certain functions, such as beds, desks, baths, wardrobes, storage and toilets, may not suffer as much from tight headroom - so consider this while you are planning your layouts.
If you haven't got the headroom? It's not all over, but it's more complicated. You could go through planning permission to lift the ridge line of your roof.
If you have height to spare on your existing top floor level of living space, there is also a method for taking out and rebuilding the first floor ceiling at a lower level to give you more headroom in the loft level. But obviously this is very involved.
Staircase position
Staircase position is crucial when planning your new loft level. Countless loft projects - that work in every other sense - may be made or broken because the new stairs (and the fire escape strategy) do, or do not, work.
You do not want to wait until the stair is actually being installed to find that it does not fit.
If you are lucky, you may be able to extend up your current staircase another level - this normally means not having to change your existing top floor layout, as long as you can accommodate the headroom.
Otherwise, you have got to balance the benefit of having a new level of living space (loft) with what you will lose from the floor below for the new staircase.
So, when you are drawing your options in Reno, you need to not only draw the new loft level, but also the level below, including the new staircase going up or down, accordingly.
You need to allow headroom up the stairs and at the top of the stairs.
Building regulations require a strict minimum of 2.0 metres of headroom above the staircase pitch line, which drops to 1.9 metres in the centre and 1.8 metres at the edges under sloped roofs.
Fire escape strategy
This is where it can get complicated and have knock-on effects on your whole house, including the ground floor layout.
The new staircase into the loft is not just a puzzle in terms of layout. Converting a loft in a typical two-storey UK house makes it a three-storey building.
The most critical rule is creating a protected escape route. This means that if a fire starts anywhere in the house, a person in the loft must be able to walk down the stairs and out the front or back of the house without exposure to the fire or its smoke.
In practice, this means that to comply with Building Regulations, the protected escape route (made up of hallways, corridors and stairwells) has to be thought about carefully, right through the house, and has to have a fire 'rating'.
- Protected escape route construction: Most UK internal walls and ceilings using plasterboard or plaster hold the required fire rating to form part of the protected escape route
- Fire doors: You may have to replace existing doors that open onto the protected escape route (on the ground and first floors) with fire doors. These provide increased fire resistance and are better at sealing in smoke
- The loft door: There should be a fire door at either the top, or the bottom (on the first floor), of the new loft stairs
- Open-plan ground floors: Building Regulations assume that most house fires start in a kitchen. So your protected escape route from the loft cannot land in an open-plan living room or kitchen unless you separate it with a new fire-rated wall, or install an approved home sprinkler system. Clearly, this could be a deal breaker for your project
- Smoke alarms: Install mains-powered, interlinked smoke detectors on every floor. If one alarm triggers, they all sound together
Permitted development or planning?
Another big one.
If your loft project can be carried out under Permitted Development (PD), rather than full planning permission, the way forward should be much easier.
Permitted Development allows for many types of loft conversion and extension, including a hip-to-gable extension. Indeed, it is sometimes possible to build something under PD that you would not get planning permission for.
The rules for PD are strict and there is a mini guide via the Government's Planning Portal website. Read more in my guide to permitted development rights.
- To be permitted development, any additional roof space created must not exceed 40 cubic metres for terraced houses and 50 cubic metres for detached and semi-detached houses
- This is a total for any roof extensions including dormers and hip-to-gable extensions
- Any previous roof space additions must be included within this volume allowance. Although you may not have created additional space, a previous owner may have done so
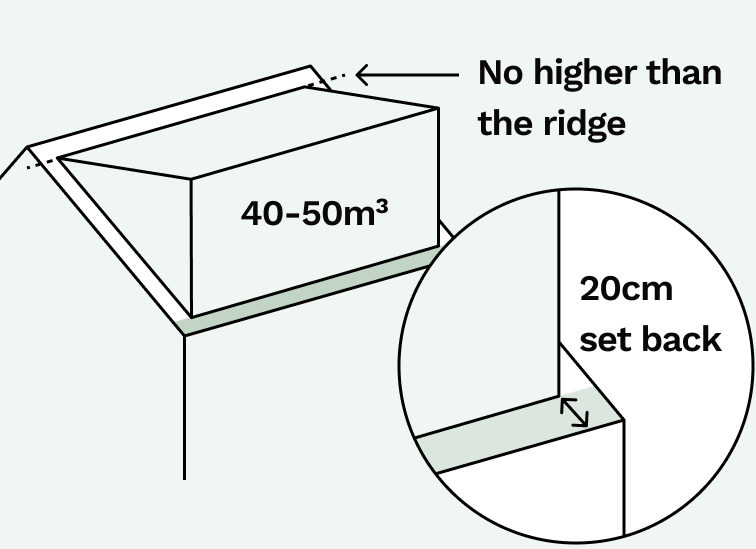
Under Permitted Development, as long as your project complies, you don't need paperwork or formal approval - you can start building.
It is possible to apply for a Lawful Development Certificate (LDC) from your local council, which is a formal legal document that proves your building project is legal and does not require full planning permission. While getting an LDC is not legally mandatory for work done under permitted development rights, it acts as an official safety net. It is proof to future buyers, mortgage lenders and neighbours.
Of course, if your plans do not fit within PD, you can still apply for full planning permission.
Loft windows and balconies
On a box dormer or pitched dormer, you can utilise the windows you would normally use in an external wall.
But there are also types of window and door that can be particularly useful for loft projects:
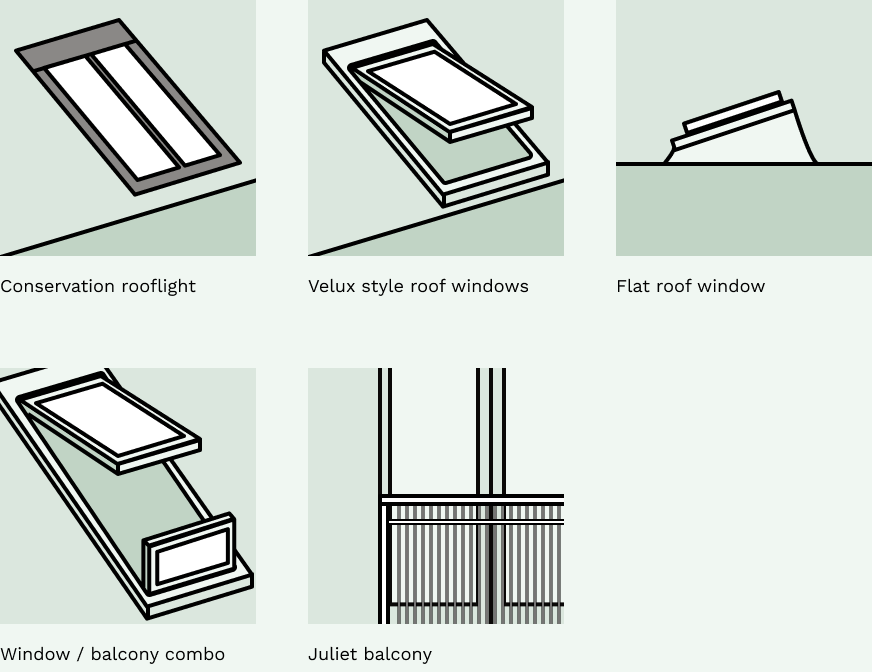
- Conservation rooflight: Low profile, does not sit above the line of the roof tiles
- Velux style roof windows: Centre pivot or top hung - the way it pivots makes a huge difference to the space inside. These can be excellent value for money. Tip: always go for options with a built-in rain sensor and auto-close, and choose the integrated blinds/awnings as part of the package
- Flat roof windows: A Velux style roof window with a kerb/upstand that can provide extra headroom within the flat roof of a box dormer. The kerb/upstand can be ordered with the window, or made by a builder
- Roof window/balcony combos: Some very innovative roof window/balcony combinations from companies such as Velux are now available
- Juliet balcony: Can be very useful for loft dormers, without adding any additional volume under permitted development
What is construction actually like?
(Once you have your layout drawn in Reno,) a turn-key loft company may be the best route forward for your project.
These contractors are very experienced in loft projects (UK houses are often surprisingly standard, in their layout and the way they are built, so odds are that they will have done a project on a house such as yours before).
A turn-key loft company will deal with all aspects of the project: structural design, planning or permitted development (permissions), building regulations, and all knock-on building works to the existing house.
Currently, there is no specific guild or federation for loft contractors, so make your own enquiries and meet with several of them early on. Read more about finding good trades for a project.
Of course, you can share your project with them through Reno, but they will almost certainly produce their own drawings after carrying out their own survey and measurements. What you will have produced in Reno will give them a direction and show a clear version of what you want. They may well offer up alternatives or clever ways of doing things that you have not thought of, so you'll be well prepared for that conversation!
Loft conversion companies can carry out the vast majority of the work from the outside of your house using external scaffolding and roof access, allowing you to live comfortably inside with minimal disruption. That way, trades people generally do not need to walk through your main living areas until the final stages of the build. This particular methodology, for carrying out the work, is one of the success stories in modern, small scale UK construction.
You could, of course go down a more traditional route with a general architect, general structural engineer and general builder, but in my experience most of these kinds of loft projects require a very particular type of experience and skill to carry out 'keyhole surgery' on your house whilst you are living in it. The methodology of construction can make, or break, the project.
The project is structured through specific stages to isolate the construction from your living spaces:
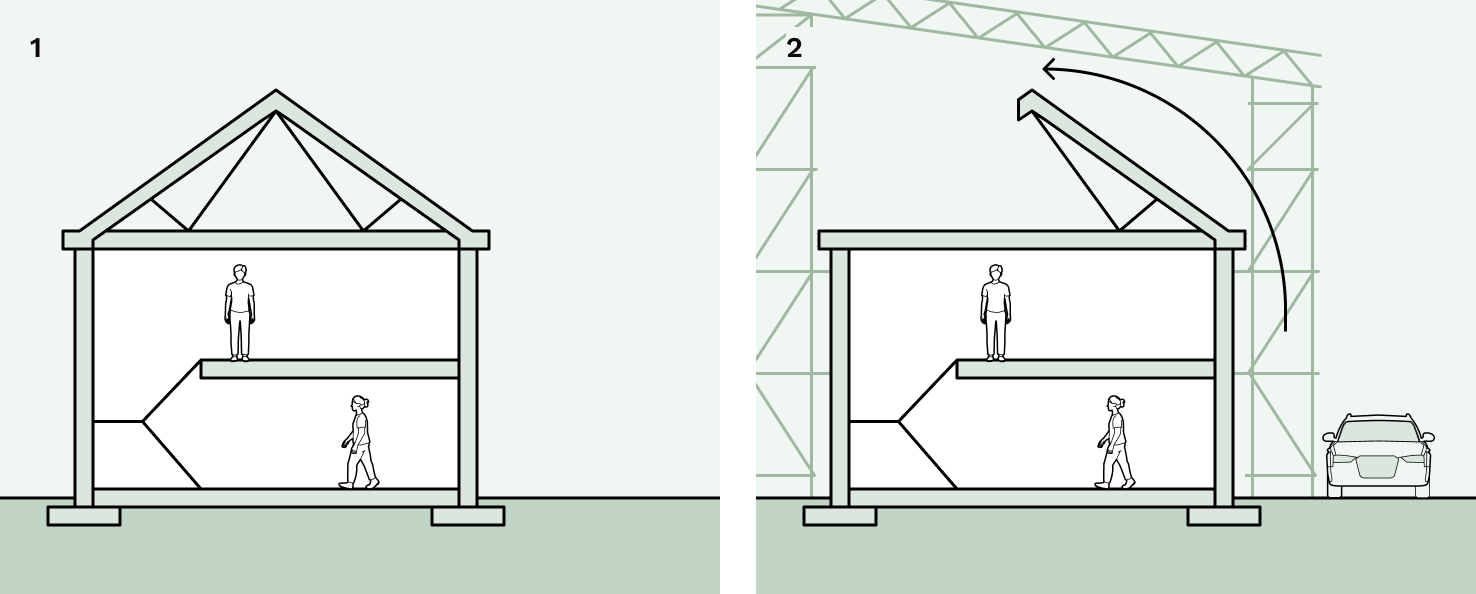
- Stage 1: Detailed design, measuring, structural design and permissions (permitted development, planning permission, building regulations - as required)
- Stage 2: Scaffold front and rear of the house with a temporary roof over the top, connecting the two. This allows access to the roofspace for men and materials, all from the outside, and also weatherproofs the project so your existing roof can be safely dismantled while you still live in the house (but you will have to clear your loft space). The existing ceiling of your top floor remains completely intact during this time, acting as a physical, dust-proof barrier between the building site and your living area. Construction debris, old rafters and tiles are passed directly out of the roof hole and down the scaffolding into a skip
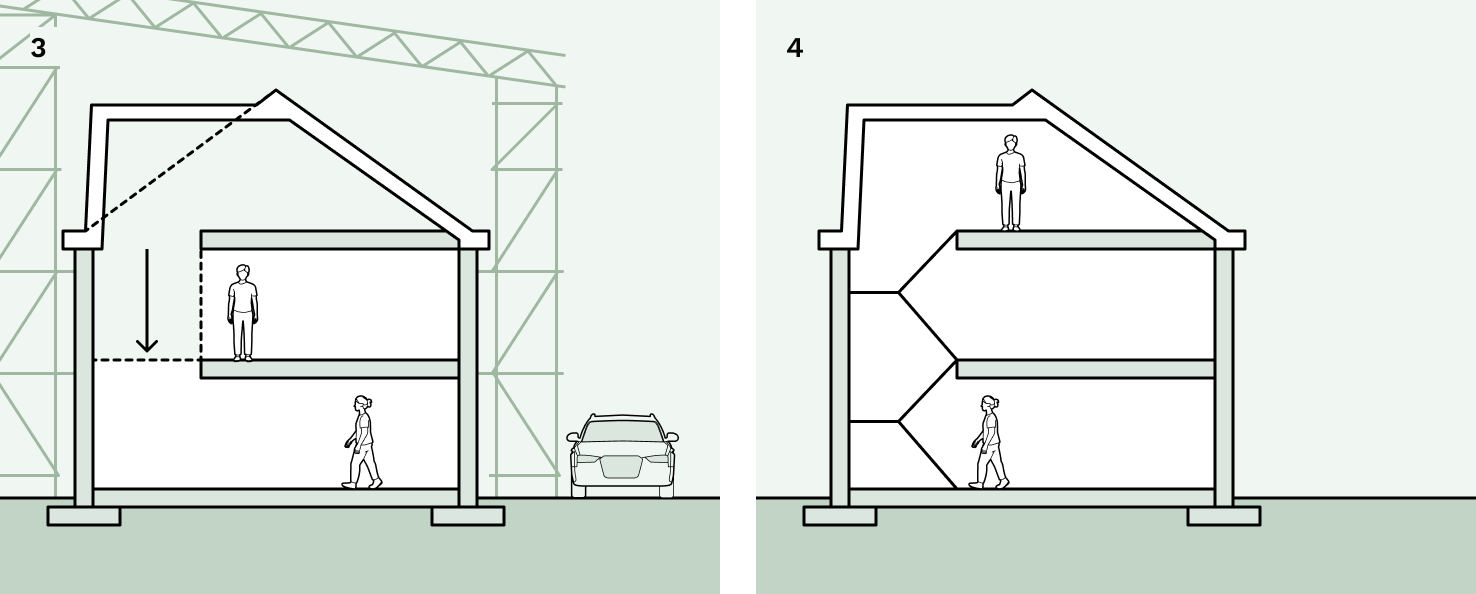
- Stage 3: The new loft floor is constructed using independent structural supports. Steel beams and new floor joists are suspended slightly above your existing ceilings. Because the workers are walking on this newly framed structural skeleton, they do not put weight on your actual plaster ceilings, preventing cracks or collapses in the bedrooms below. By temporarily screening off part of your first floor, the new staircase can be inserted from above, whilst you remain living in most of the house
- Stage 4: Scaffolding removed, new staircase in use, works to the protected escape route (fire doors, smoke alarms as required), and internal services connections take place - so there is some cross over into the main house
Conclusion
A loft conversion can be one of the most effective ways to create more space in your home, but the best solution is not always the biggest one. The shape and structure of your existing roof, available headroom, position of the stairs, natural light and the space you need to accommodate all play a part in deciding what will work.
Also, loft conversions can have knock-on effects through the whole house - for this reason, and due to their key-hole method of build, they are always complex projects, even a 'simple' loft conversion.
Before you start talking to builders, it is worth taking the time to understand your existing loft and explore the possibilities. Measure the space, think about how much room will be lost to the new floor and insulation, and try different layouts to see what you could realistically create.
This is where drawing and testing different options becomes so useful. A rooflight conversion might be enough for one house, while another may need a dormer or hip-to-gable extension to create the headroom and floor area required. You won't know which is right for your home until you explore the options.
Using Reno, you can start this process yourself - drawing your existing space, testing different loft configurations and seeing how the new staircase, rooms, furniture and storage could fit together.
The aim isn't to replace the architect, structural engineer or builder. It's to arrive at those conversations with a much clearer understanding of what you want, what might be possible and which options are worth exploring.
The best loft conversion starts before the building work begins - with a good understanding of the space you already have and a few carefully considered ideas about what it could become.
Frequently asked questions
Do I need planning permission for a loft conversion?
Not always. Many loft conversions fall under Permitted Development, which means no formal planning application is required as long as the added roof space stays within the volume allowance. This is 40 cubic metres for terraced houses and 50 cubic metres for detached and semi-detached houses. Any previous roof space additions, even those made by a former owner, count toward this total. Projects that exceed the allowance, or that don't otherwise qualify, will need full planning permission.
How much headroom do I need for a loft conversion?
There's no legal minimum ceiling height for general living space in UK building regulations. Staircases are treated differently: they need at least 2.0m of headroom over the pitch line, dropping to 1.9m at the centre and 1.8m at the edges under sloped ceilings. In practice, most designers won't plan a whole ceiling below around 2.1m, since anything tighter starts to feel cramped and traps heat.
Can every loft be converted?
Not automatically. It depends on the shape of the roof, the headroom left once you account for a new floor structure and insulation (expect to lose roughly 150mm around all three sides of the existing roof triangle, equivalent to about 300mm of headroom), and whether a workable staircase position can be found. Where the existing space falls short, a dormer, a hip to gable extension, or in some cases a raised ridge line can create the extra room needed.
Do I need to move out during a loft conversion?
Usually not. Most loft conversion companies carry out the structural work, including removing the roof, building the new floor and fitting the staircase, from external scaffolding with a temporary roof connecting the front and rear of the house. The existing ceiling below stays intact throughout, acting as a dust proof barrier between the building site and your living space. Disruption tends to be limited to the later stages, when the staircase opening and services connect into the rest of the house.
What's the difference between a dormer and a hip to gable loft conversion?
A dormer adds a boxed out structure with vertical walls and windows onto the existing roof slope, creating extra headroom and floor area. A flat roof dormer, usually built at the rear, creates the most additional space of any dormer type. A hip to gable conversion instead squares off a sloped (“hipped”) end of the roof into a vertical gable wall, increasing internal space without adding a separate volume on top of the roof.
Do I still need building regulations approval if my project is Permitted Development?
Yes. Permitted Development only removes the need for planning permission; it has no bearing on Building Regulations. Regulations approval is a separate, mandatory process that covers structural safety, insulation, ventilation, and the fire escape strategy, and it applies whether or not planning permission was needed for the project.
What is a protected escape route, and why does it matter for a loft conversion?
Converting a loft effectively turns a typical two storey house into a three storey one from a fire safety standpoint. Building regulations require a continuous, fire rated escape route from the loft down through the house to an exit, since a person in the loft must be able to reach the front or back door without passing through fire or smoke. Meeting this can mean fitting fire doors on the ground and first floor, upgrading walls and ceilings along the route, and installing interlinked smoke alarms on every floor. It can also rule out landing the new staircase in an open plan kitchen or living room, unless that space is separated by a fire rated wall or protected by an approved sprinkler system.
Renovating? Read more...
All rooms
Permitted Development Rights
Scott Batty explains what you can build without planning permission, from rear extensions and loft conversions to the 'original house' rule and Lawful Development Certificates.
All rooms
Home renovation certificates
Which certificates and sign-offs a loft conversion or extension can trigger, and how to keep the paper trail straight.
All rooms
Why an accurate floor plan matters so much in a renovation
Why accurate plans matter for quotes, layouts, wall details, first fix decisions and quantities before work starts.
All rooms
Do I need an architect?
Scott Batty explains what architects actually do, where they add value, and the misconceptions homeowners should avoid before starting a building project.
All rooms
How do I find good trades for my project?
Get local recommendations, use the internet to verify, prepare a brief, get three quotes and talk to previous customers!
Free tools to get started


Join our mailing list and get 10% off
Who are you? *
By signing up, you are agreeing to our Terms and Privacy Policy including receiving emails from us at Reno (you can unsubscribe at any time). Opted out but want back in? Re-subscribe to the mailing list .
Start your renovation with Reno