Help & advice
Where do you want the light switches?
Last updated: March 02, 2026
Choosing where you want your light switches is not too complicated, but it is very easy to forget to plan ahead. You can end up living with the results for years after making a decision too quickly based only on what was there before or what your electrician suggests on the day!
General guidelines

- Place the switch on the inside wall of the room you are entering, close to the doorway (except for bathrooms, those are outside and for good reason!)
- Position it on the opening side of the door, so the door does not block access when opened
- 150mm from the door frame to the switch plate as a rule of thumb
- Switches are installed no higher than 1200mm from the floor, in line with accessibility guidance
- Put different types of lighting on separate switches so you can control the mood / function of the room
Understanding light switch terminology
When you start choosing actual switches to buy (fun!), the wording can be confusing if you have not come across it before.
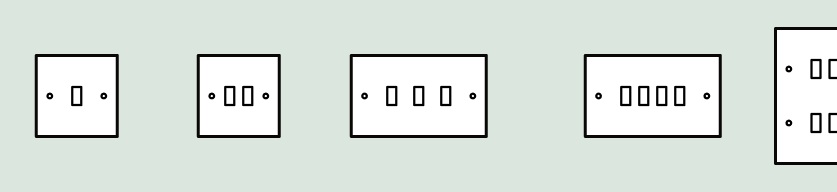
Gang simply means the number of switches on one plate.
- 1 Gang = one switch
- 2 Gang = two switches
Two-way and intermediate describes how many locations can control the same light.
- Two-way switching allows one light to be controlled from two different places, like the top and bottom of a staircase
- Intermediate switches are used when a light needs to be controlled from three or more locations, usually in long hallways or large open spaces
Tricky spots
Hallways and entrances
- When you get in through the main door of your home, you should be able to reach a light switch immediately
- If the staircase is set back or the hallway is large, a second switch at the bottom of the stairs can control the same lighting
- Two-way switching between downstairs and upstairs so you are not walking in the dark
Double doors

If the doors open inwards, the light switch is usually better outside the room, positioned on the side that will not be hidden behind the open door.
You need to be able to reach the switch without walking into a dark room or reaching around one of the doors!
Through rooms and open plan spaces
In open / broken plan spaces you pass through different areas to reach somewhere else, so where to place your light switches becomes less obvious.
Think about:
- Multiple switch points so lights can be turned on and off from either end of the space
- Separate switches for different zones, such as dining, seating or circulation areas

Bedrooms
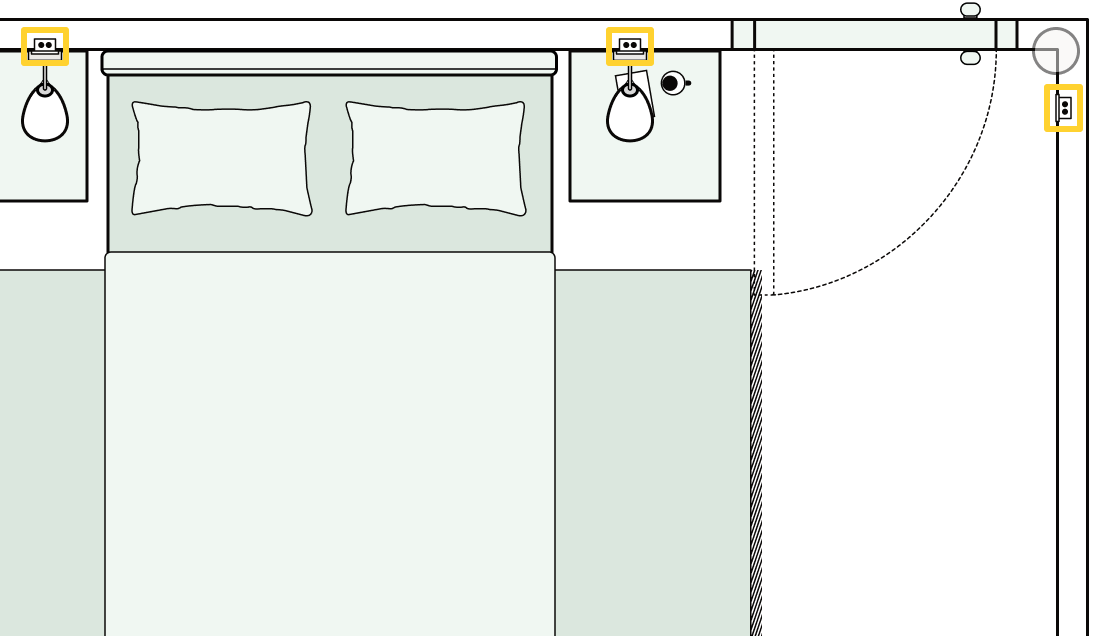
When planning your bedroom' switches and sockets, you can take a lot of inspiration from good hotel room design. So you'll want the main switch by the doorway, as usual, then to think about:
- An additional switch beside the bed so that a light can be turned off without getting up (or fumbling around in the dark for the lamp switch)
- Separating the main ceiling light from wall lights or reading lights or any ambient lighting
Read more on where to put sockets in a bedroom and how many you need!
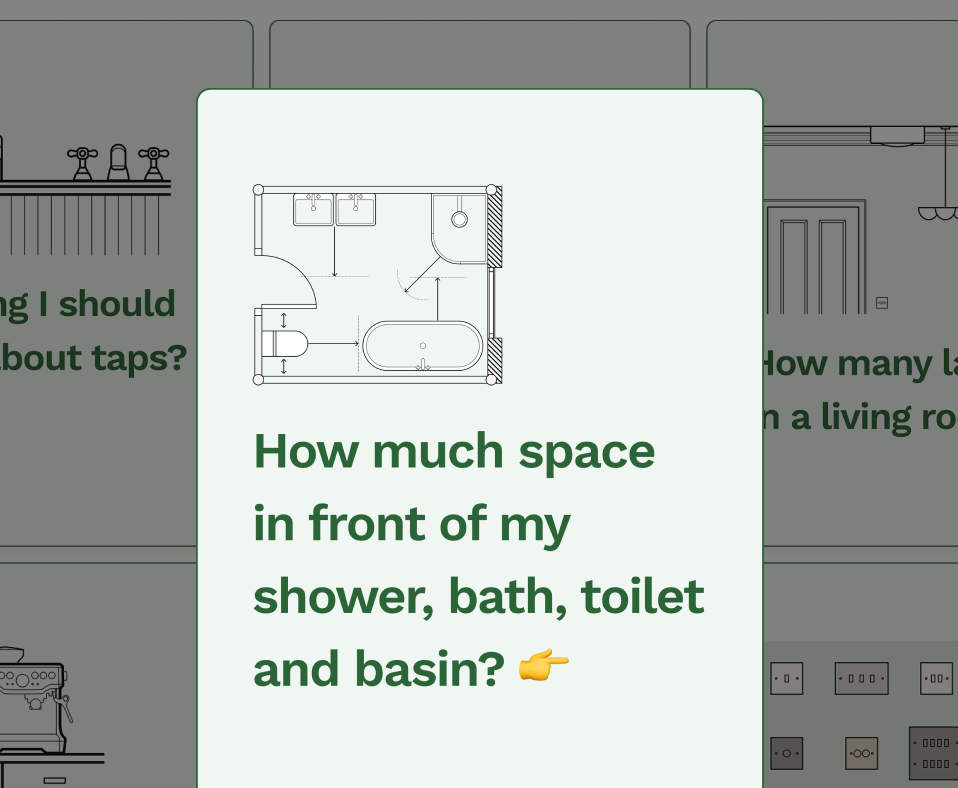
Bathrooms
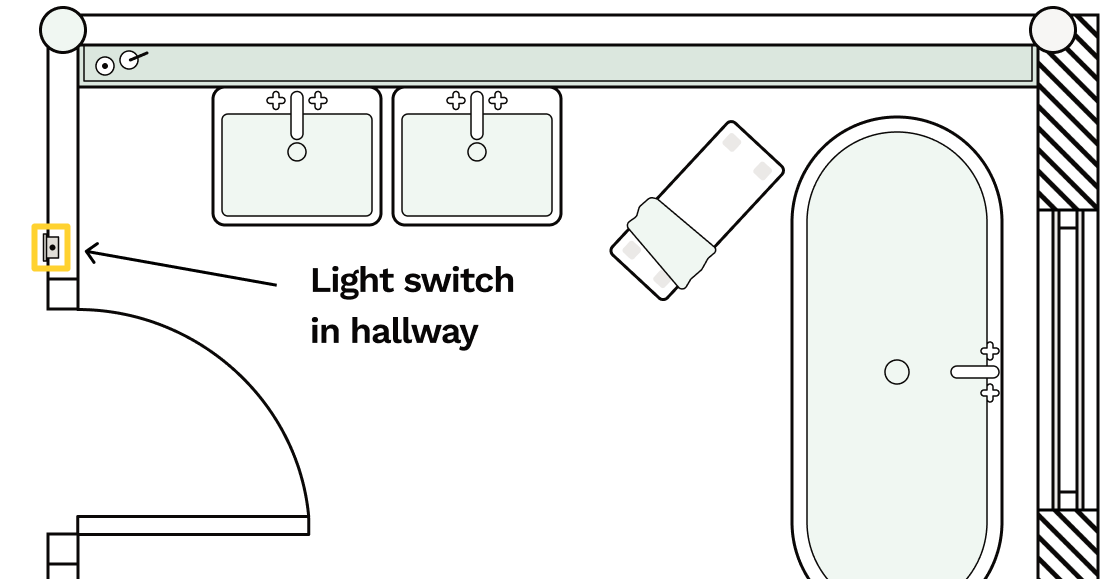
You'll rarely see a light switch inside a bathroom – just pull cords - because water increases the risk of electric shock and most of our bathrooms in the UK aren't large enough for a switch to be at a safe distance. Place your light switch outside the door, on the handle side, or use a pull cord inside the bathroom instead.
Getting your electrics done? Plan your switches, sockets and all other electricals effortlessly on Reno to instruct your electrician!

Frequently asked questions
Where should light switches be placed in a room?
Light switches are usually placed on the inside wall of the room you are entering, close to the doorway and on the opening side of the door so they are not blocked. In line with UK accessibility guidance, aim for 150 mm from the door frame and no higher than 1200mm from the floor.
What height should light switches be in UK homes?
In UK homes, light switches are installed no higher than around 1200mm above floor level. This aligns with accessibility guidance in building regulations and keeps switches within comfortable reach for most people.
Bathroom light switch regulations UK – inside or outside?
In the UK, the bathroom light switch is normally outside the bathroom or a pull-cord inside. That's because switches inside the bathroom must meet the IPX4 splash rating and be in the correct electrical zone. If you want a wall switch inside, it has to sit outside Zones 0, 1 and 2 (so away from the bath/shower) and be suitably rated. Otherwise, stick to the classic pull cord just inside the door or a standard switch outside.
What is the difference between 1-gang, 2-gang and 3-gang light switches?
“Gang” refers to the number of switches on one plate. A 1-gang switch controls one lighting circuit, a 2-gang controls two, and 3 or 4-gang plates allow multiple lighting circuits to be controlled from the same position.
What is two-way or intermediate light switching?
Two-way switching allows the same light to be controlled from two different locations, such as the top and bottom of a staircase. Intermediate switching is used when a light needs to be controlled from three or more positions, often in long hallways or large open-plan spaces.
Should bedrooms have a light switch next to the bed?
Many bedrooms include an additional switch beside the bed so the main light can be turned off without getting up. Lighting is often split so ceiling lights, bedside lights and ambient lighting can be controlled separately for comfort.
Renovating? Read more...
Bathroom
Bathroom lighting and electrical zones
Resist the temptation to “just put spotlights everywhere”!
Bedroom
Mastering bedroom lighting, what do I need to know?
One thing that everyone seems to agree on is to make sure you have different types of lighting in your bedroom, also known as layering.
Dining
How to effectively light your dining room
Lighting plays a crucial role in setting the right mood and functionality in your dining room.
Bathroom
Why is the bathroom light switch outside the bathroom?
Understanding the reasons behind where the light switch goes for bathrooms and ensuites in the UK.
Lounge
How many lamps in a living room?
Figuring out how many lamps you need in a living room isn't about strict formulas or calculators. You could go down the lumen calculator route…
All rooms
Where do you want the radiators?
Once the pipes are in, you will live with that decision for years to avoid having to move the bed or have the floor taken up again… so it's worth planning ahead where you actually want the radiators to be and why!
All rooms
What needs to be decided before first fix?
Pipes and cables are installed inside walls and floors, so changes become expensive and disruptive.
Lounge
Where to put plug sockets in a living room
Plan living room sockets around your sofa, TV, lamps and charging spots so you avoid extension leads and end up with power exactly where you need it.
Free tools to get started

Join our mailing list and get 10% off
Who are you? *
By signing up, you are agreeing to our Terms and Privacy Policy including receiving emails from us at Reno (you can unsubscribe at any time). Opted out but want back in? Re-subscribe to the mailing list .
Start your renovation with Reno